Parts Dashboard has a collection of tools for importing data into the system.
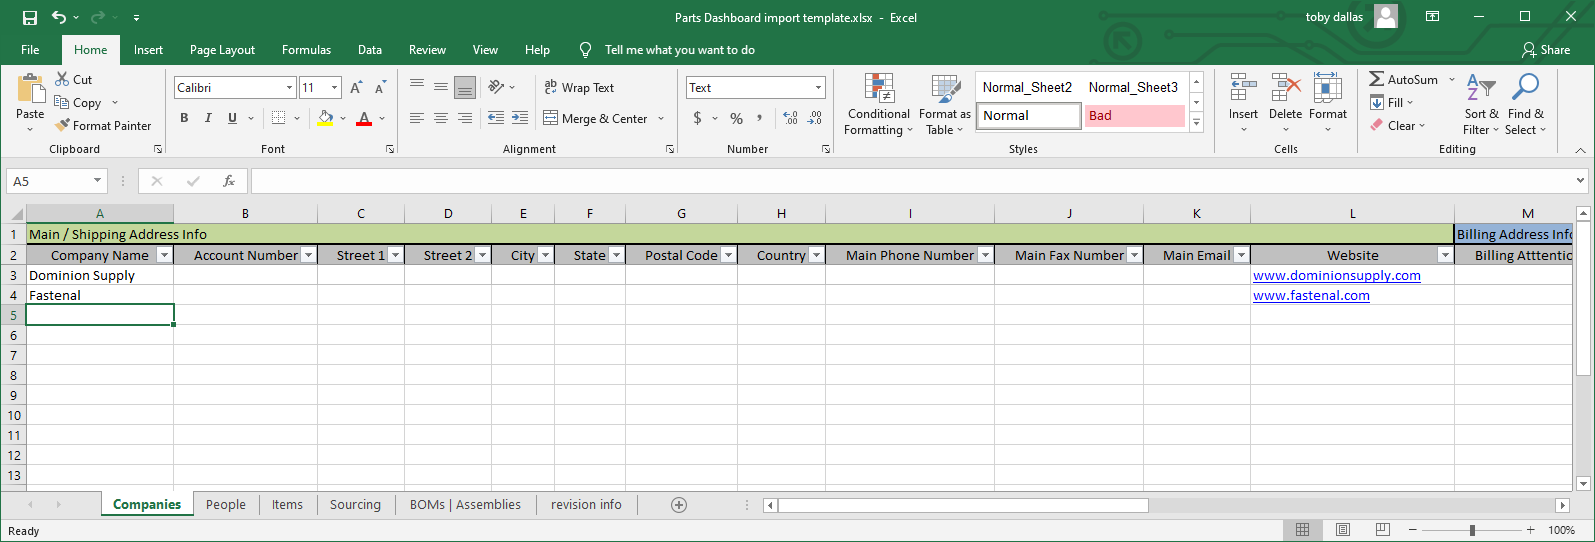
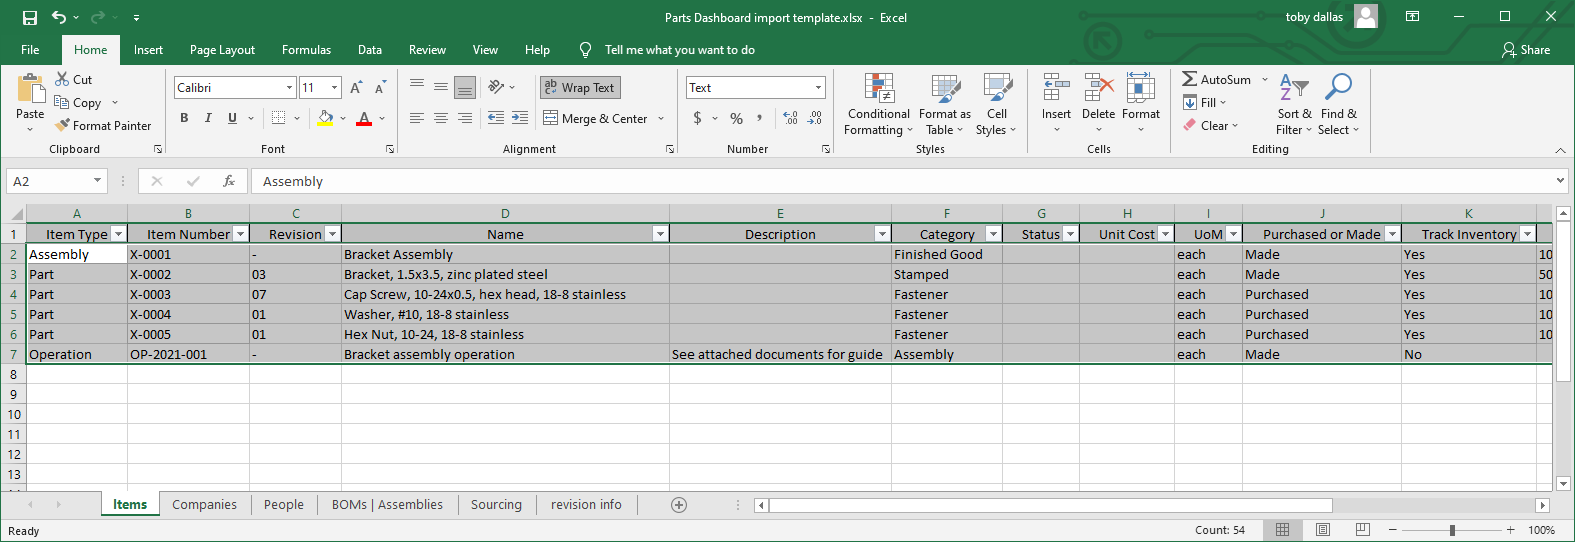
The starting point is having your data arranged into tables in a spreadsheet. You can use either our provided template, or construct a spreadsheet of your own that matches the columns in the importers.
There are 5 importer tools:
- Companies
- People
- Items
- Sourcing
- BOMs / Assemblies
This also represents the order of operations you should follow when importing data. The reason is that when you get to the Items and the Sourcing tools, you are able to select companies — but these need to already have been imported in order for them to come in with the items and their sources.
Skip any of the importers for which you have no information.
You can import as much or as little data as you wish. There’s often more columns that you need or will want to use, so just fill in the data that you have.
Note: there’s currently no data validation on the importers so please be careful about the data types you use (ie: make sure you only put numbers and not text into fields like Quantity, etc.). We’ll be improving this through subsequent releases but right now it’s wide open. Also, be careful not to duplicate any entries that might already be in Parts Dashboard, currently you will not be warned if you’re duplicating something.
Watch the overview video, and see more detail further below.
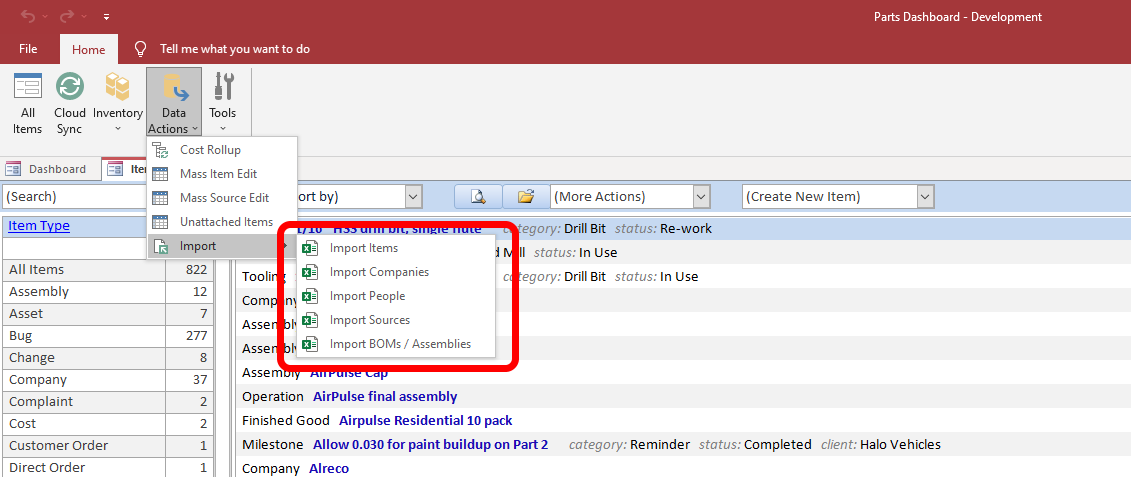
Access the importer tools from the Data Actions and then Import menu in the ribbon
Companies
1. Use the Companies tab of the importer template (or make your own template with the columns matched appropriately) and fill in as much information as you have
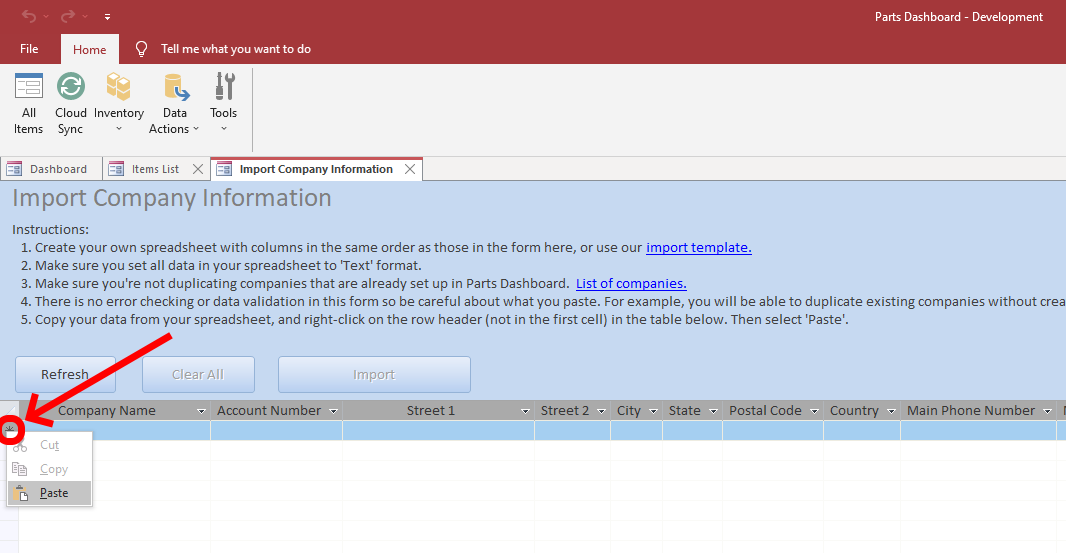
2. Select the information you wish to import, and copy it (either right-click to select Copy, or use Ctrl+C keys)

3. Right-click on Data Actions in the ribbon menu, then choose Import, and Import Companies
4. Ensure that you’re not importing any companies that are already set up as you will duplicate them in this step. Click on the List of companies link to see what companies are already in Parts Dashboard.

5. Right-click on the row header in the first open row in the importer and select Paste, or use the Ctrl+V keys to paste the information you want to import
6. When your information is pasted and you’ve confirmed that it looks correct and is in the correct columns, click the Import button
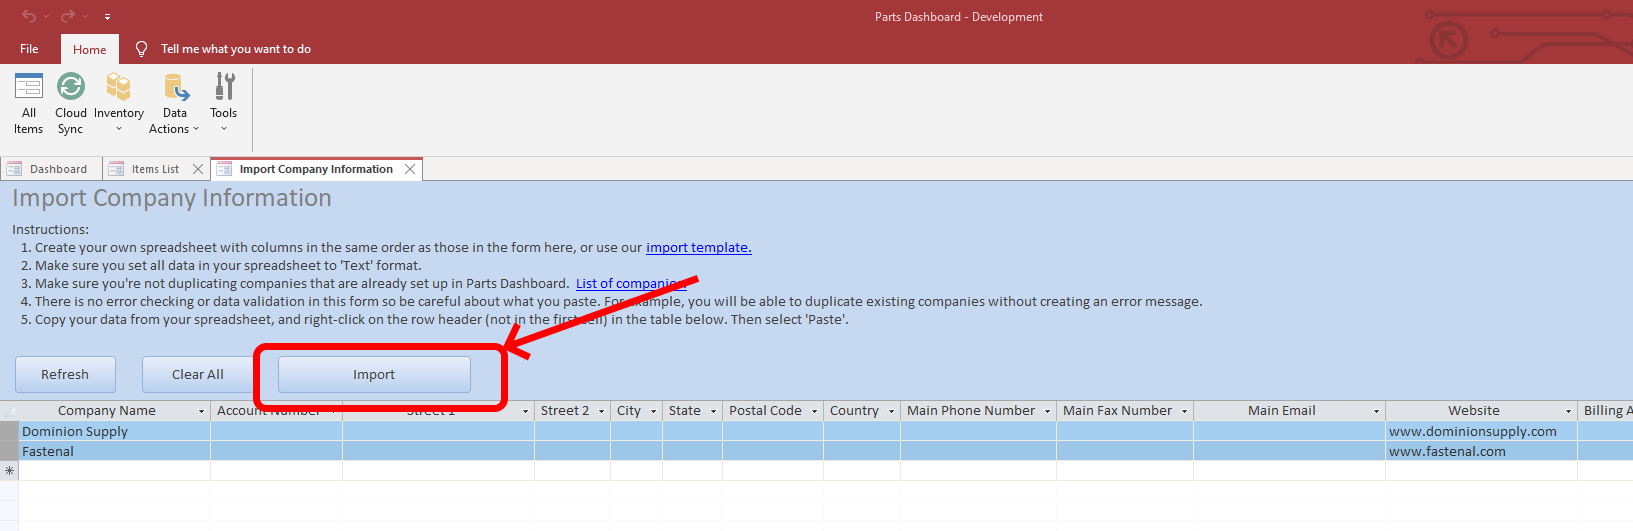
7. Import complete! Return to the main items list to see your newly imported companies.
People
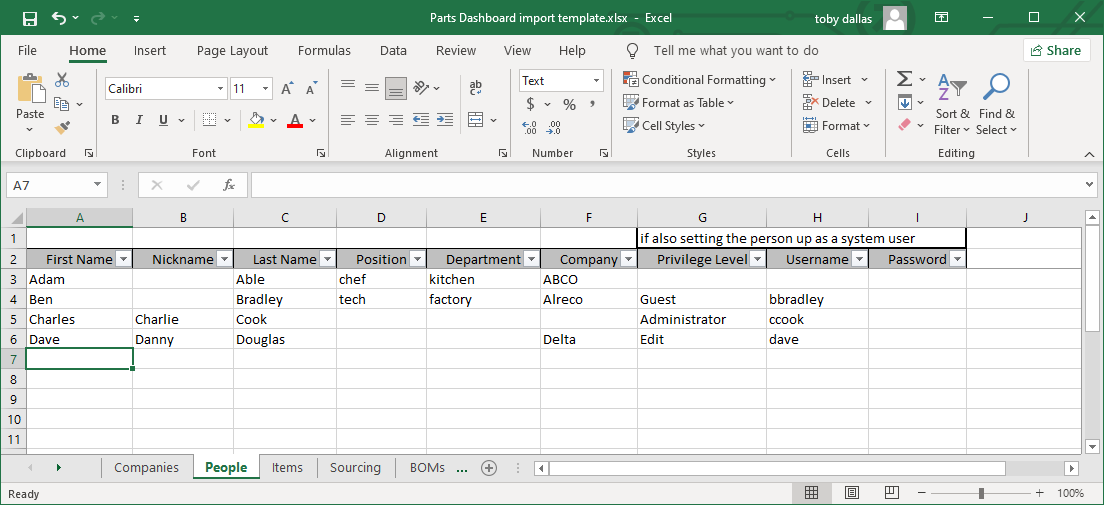
1. Use the People tab of the importer template (or make your own template with the columns matched appropriately) and fill in as much information as you have
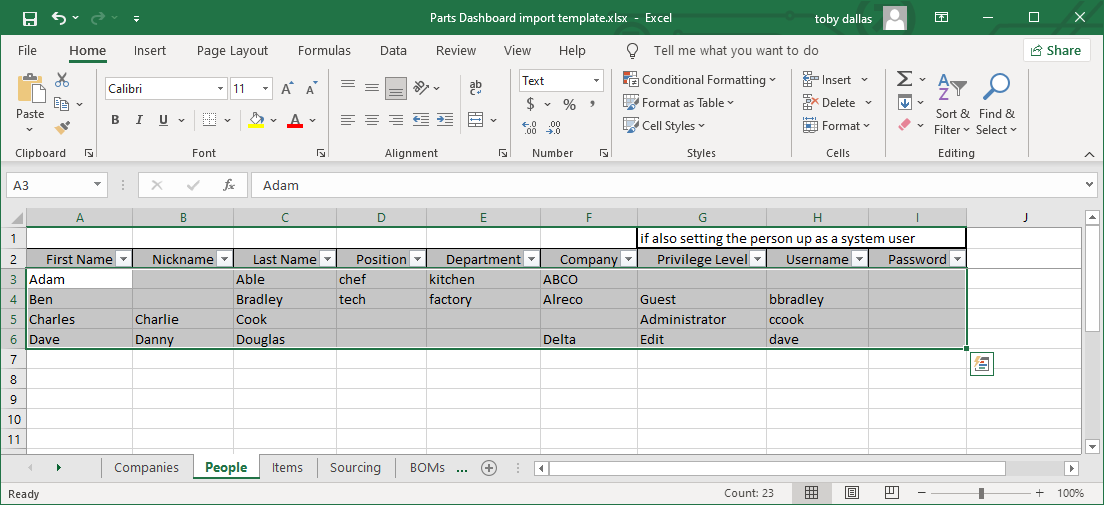
2. Select the information you wish to import, and copy it (either right-click to select Copy, or use Ctrl+C keys)
3. Right-click on Data Actions in the ribbon menu, then choose Import, and Import People
4. Ensure that you’re not importing any people who are already set up as you will duplicate them in this step. Click on the List of people link to see what people are already in Parts Dashboard. Note that you cannot create new companies in this screen, so check that you have already created any companies that people belong to. Check the List of companies for these, and if you need to create a new company see the previous section.
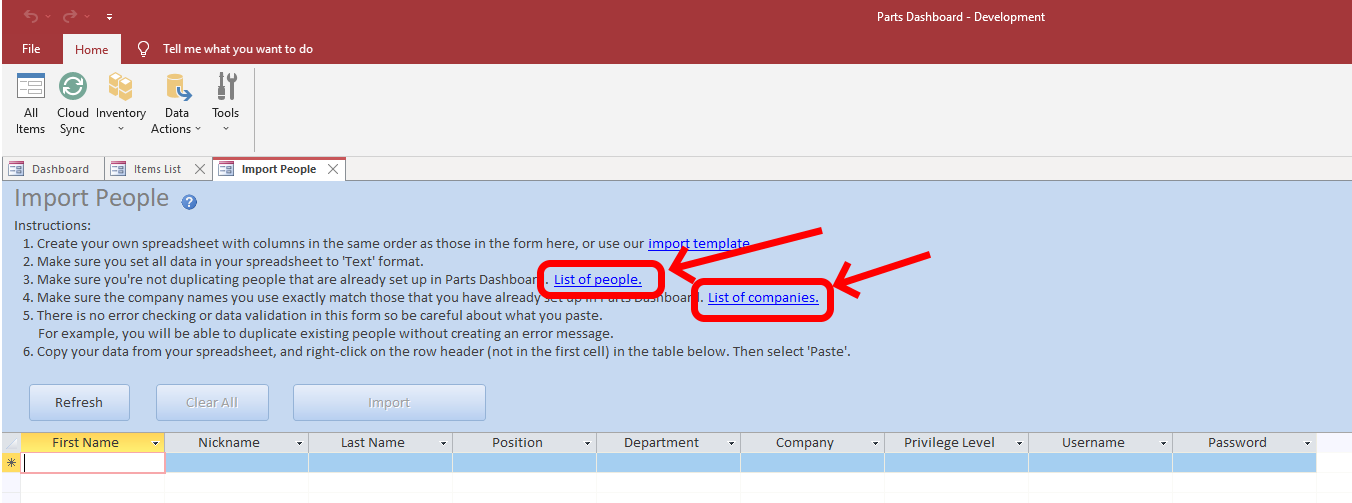
5. Right-click on the row header in the first open row in the importer and select Paste, or use the Ctrl+V keys to paste the information you want to import
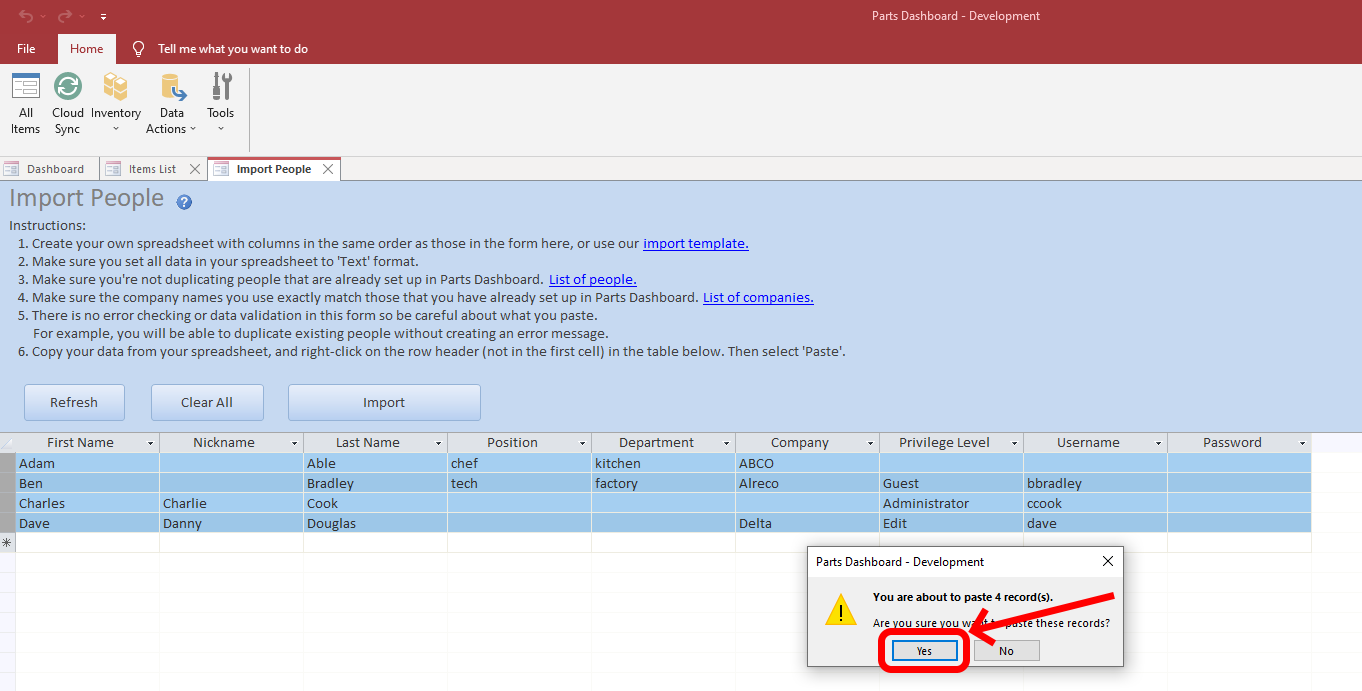
6. When your information is pasted and you’ve confirmed that it looks correct and is in the correct columns, click the Import button.
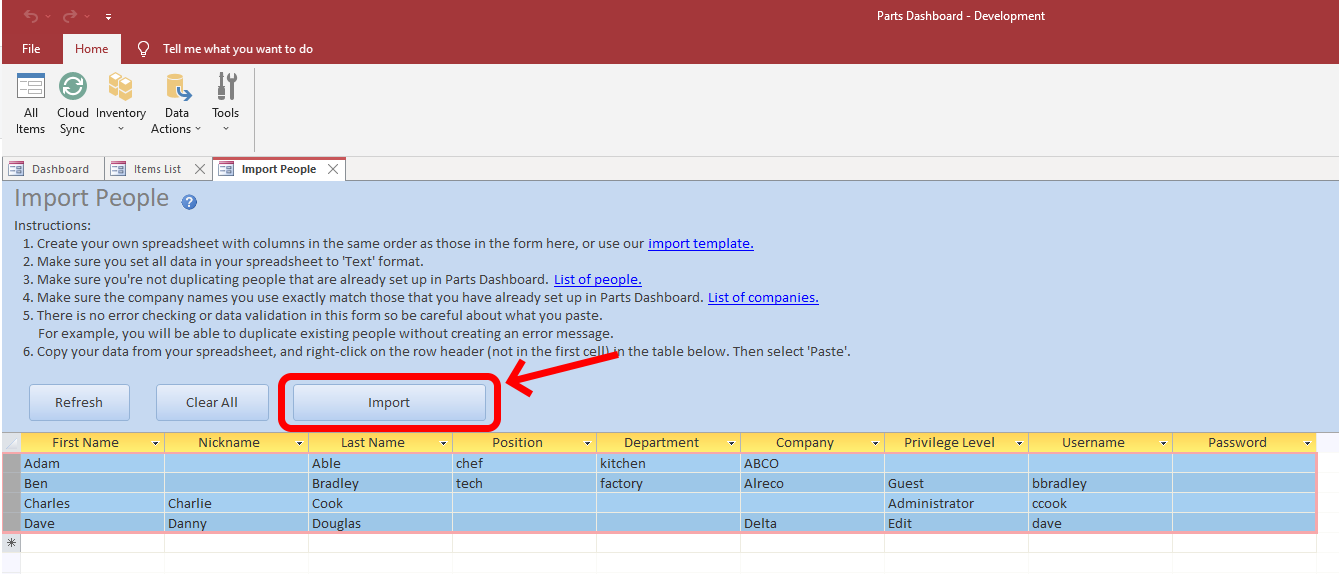
7. Import complete! Return to the main items list to see your newly imported people.
Items
Items are the primary objects in Parts Dashboard. Both companies and people are also items, but we use dedicated importers for those items simply because they’re configured so differently from most ‘general’ items. These general items can be things like parts, documents, projects, processes, inspections, etc..
Your company administrator will have set up the different classes of items that you will be using, and you can only import items that belong to these classes. If you need to import item classes that are not already set up then please talk with your administrator.
1. Use the Items tab of the importer template (or make your own template with the columns matched appropriately) and fill in as much information as you have
2. Select the information you wish to import, and copy it (either right-click to select Copy, or use Ctrl+C keys)
3. Right-click on Data Actions in the ribbon menu, then choose Import, and Import Items
4. Ensure that you’re not importing any items that are already set up as you will be duplicate them in this step
5. Right-click on the row header in the first open row in the importer and select Paste, or use the Ctrl+V keys to paste the information you want to import
6. When your information is pasted and you’ve confirmed that it looks correct and is in the correct columns, click the Import button.
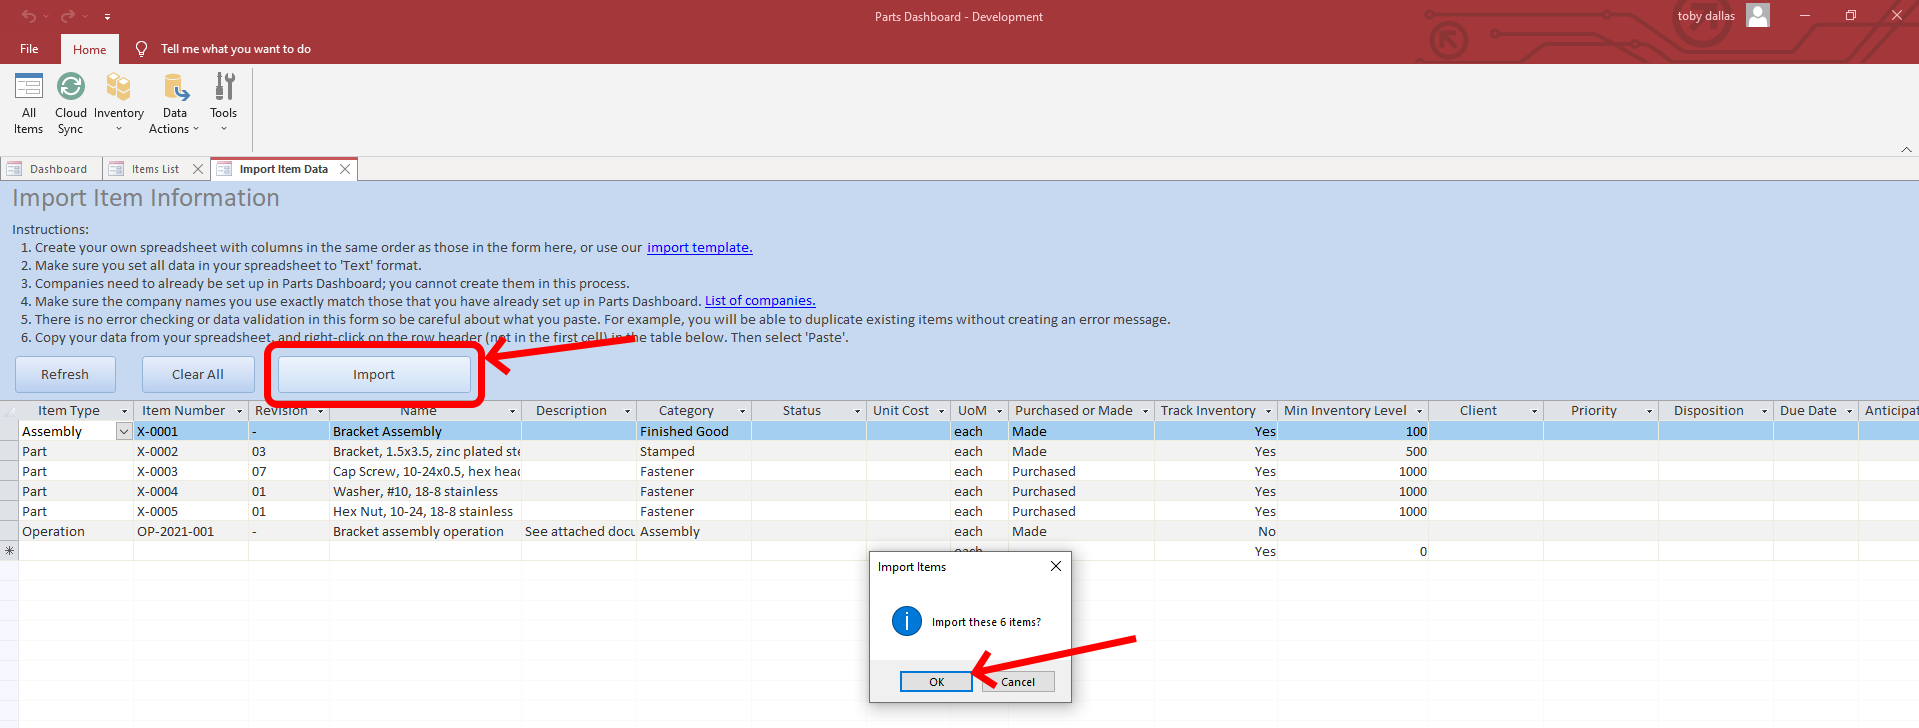
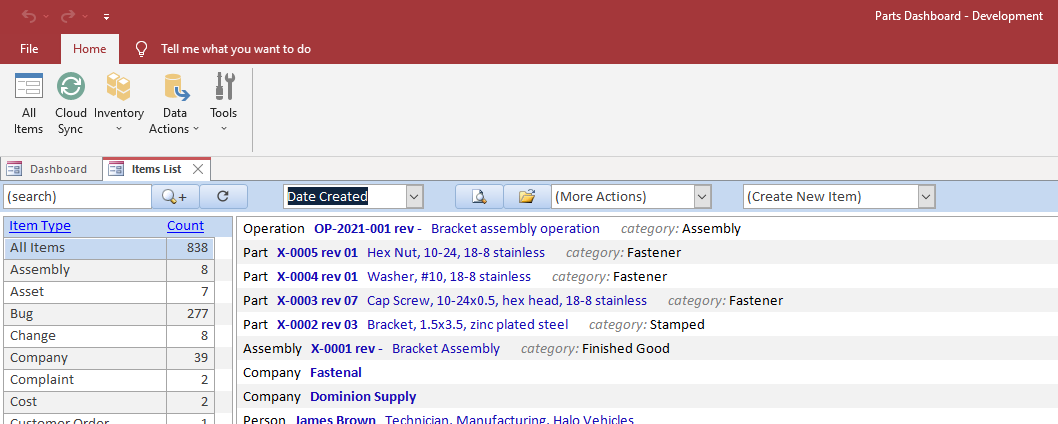
7. Import complete! Return to the main items list to see your newly imported items. (Here I sorted by Date Created twice in the Sort By dropdown to bring my most recently created items to the top of the list.)
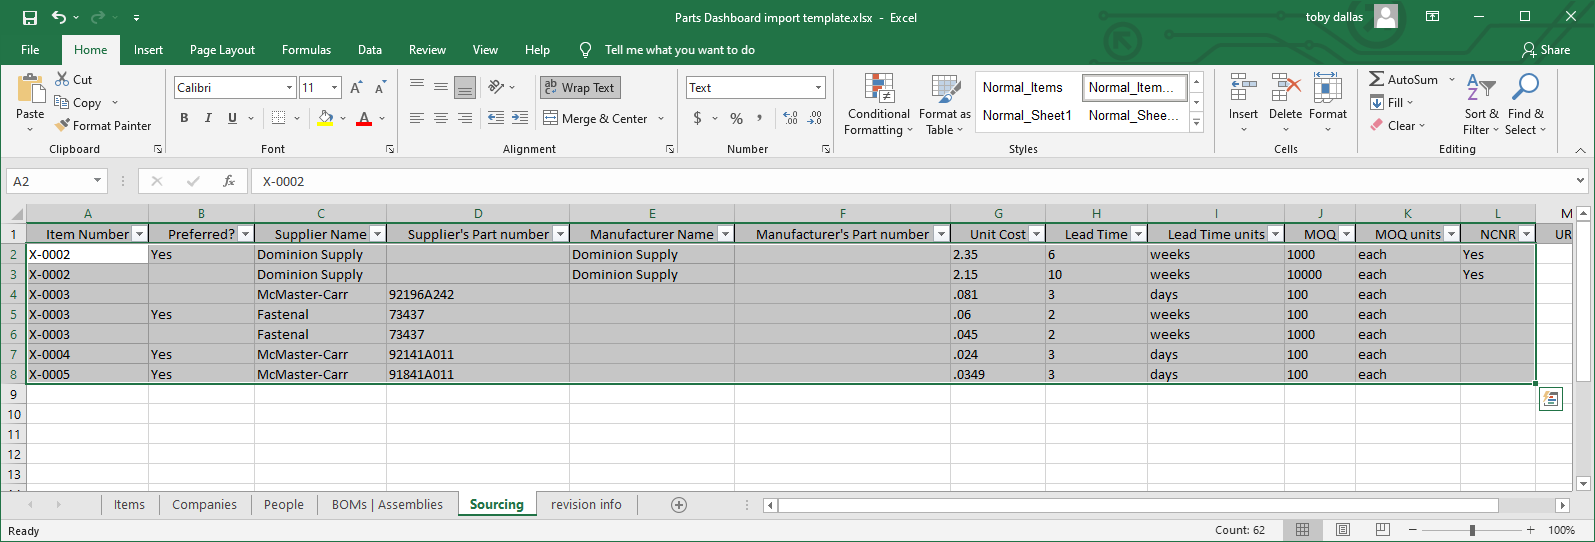
Sources
Here is where to import sourcing information (suppliers, manufacturers, prices, minimum order quantities, lead times, etc.) for your items. For a single item, you can have multiple prices from the same supplier, and you can have multiple suppliers.
You must have one (and only one) preferred supplier for each item. This is so that this preferred source pricing can flow through into the item’s costing, and then into any BOMs where it features. To do that, set the Preferred? column to “yes”, and leave non-preferred sources blank or set them to “no”.
1. Use the Sources tab of the importer template (or make your own template with the columns matched appropriately) and fill in as much information as you have
2. Select the information you wish to import, and copy it (either right-click to select Copy, or use Ctrl+C keys)
3. Right-click on Data Actions in the ribbon menu, then choose Import, and Import Sources
4. Ensure that you’re not importing any sources that are already set up as you will duplicate them in this step
5. Right-click on the row header in the first open row in the importer and select Paste, or use the Ctrl+V keys to paste the information you want to import
6. When your information is pasted and you’ve confirmed that it looks correct and is in the correct columns, click the Import button.
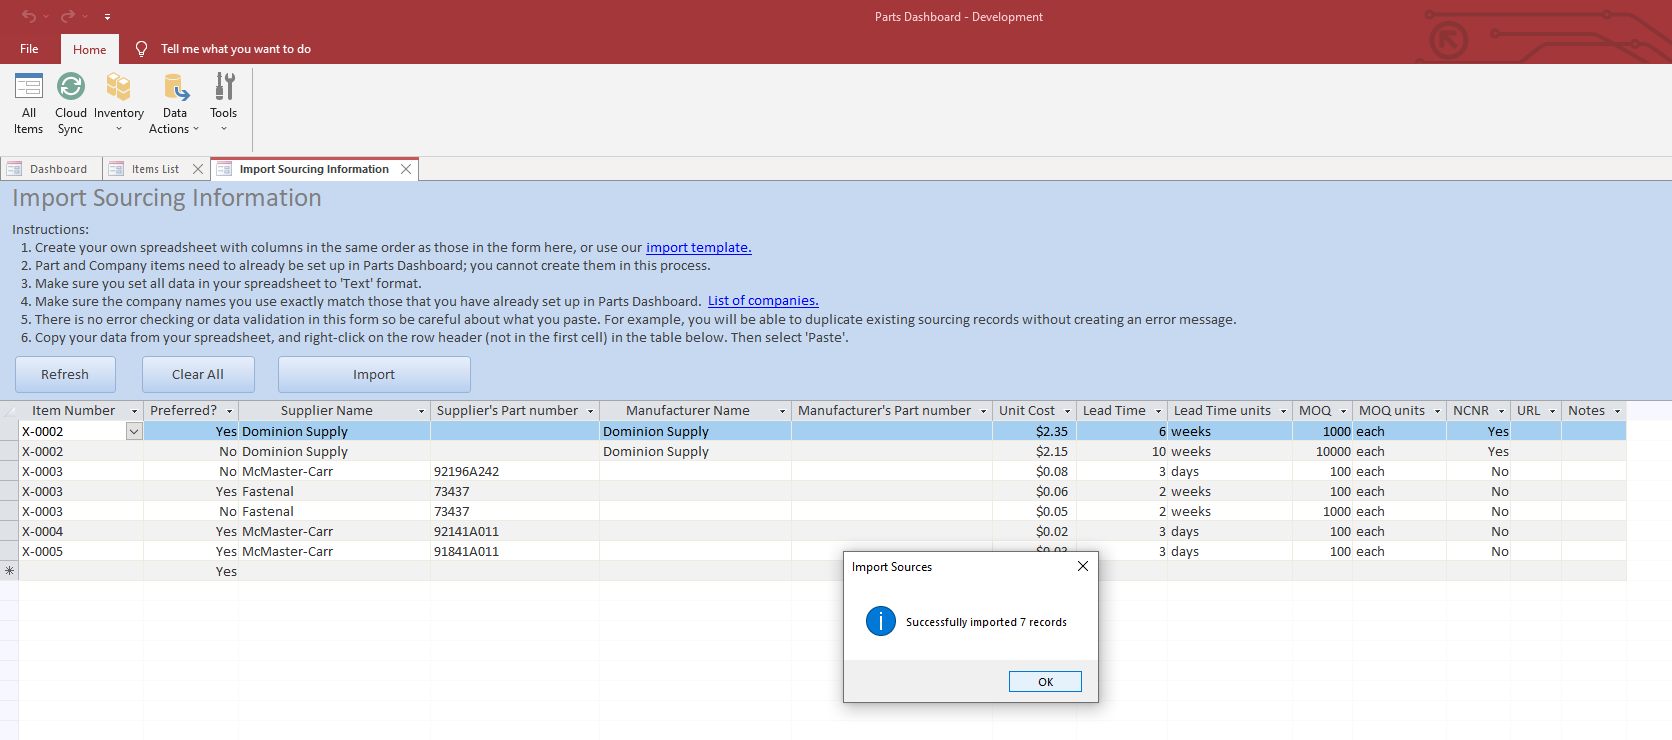
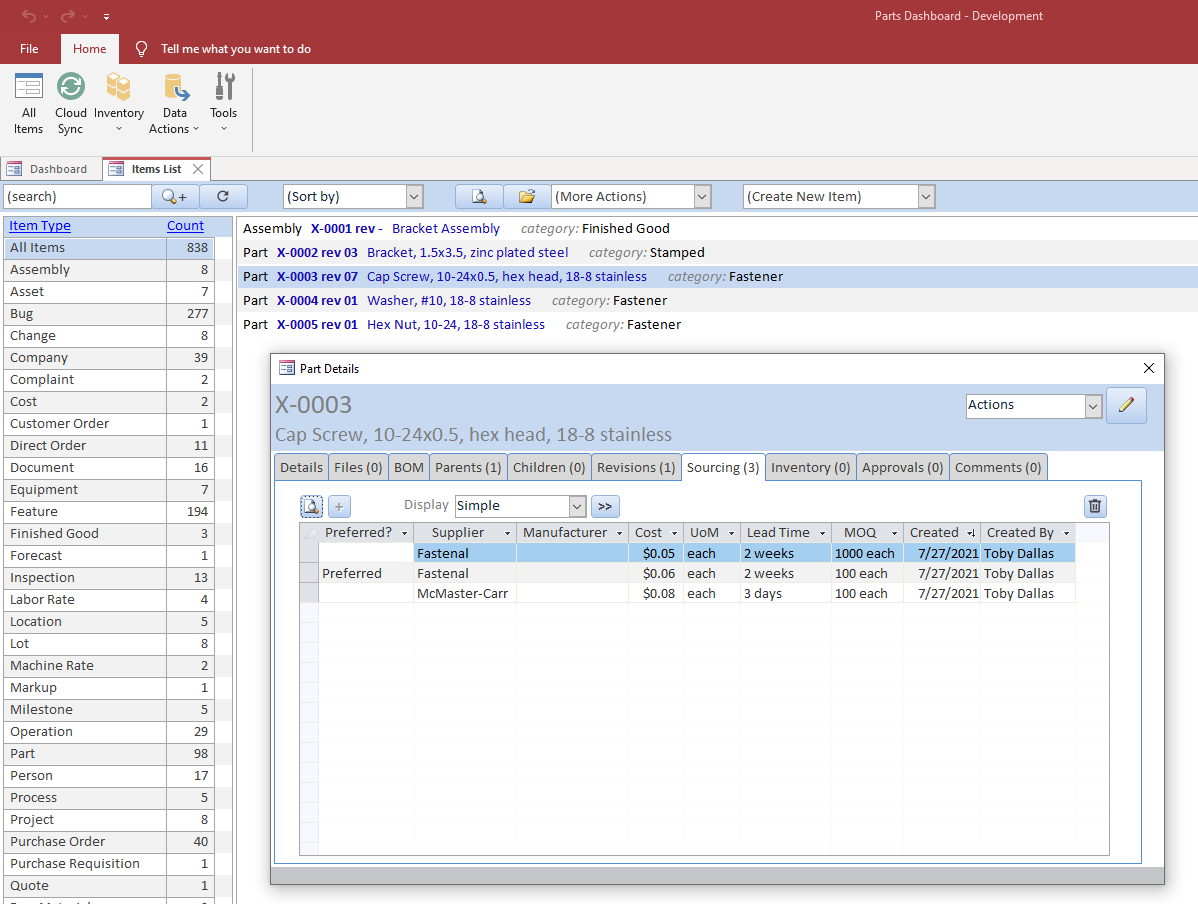
7. Import complete! Return to the main items list to find one of the items for which you imported sources, and then check that item in the Sources tab.
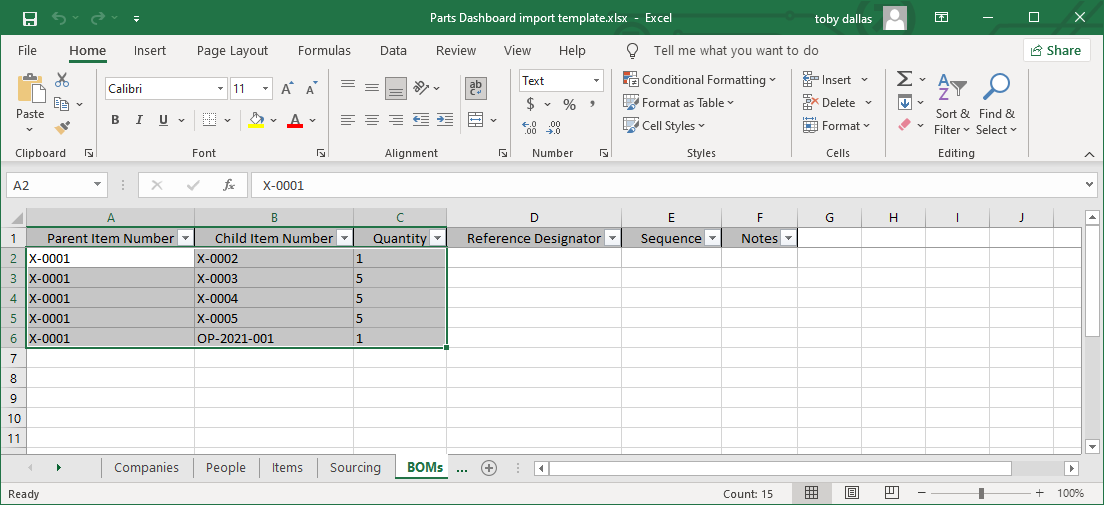
BOMs / Assemblies
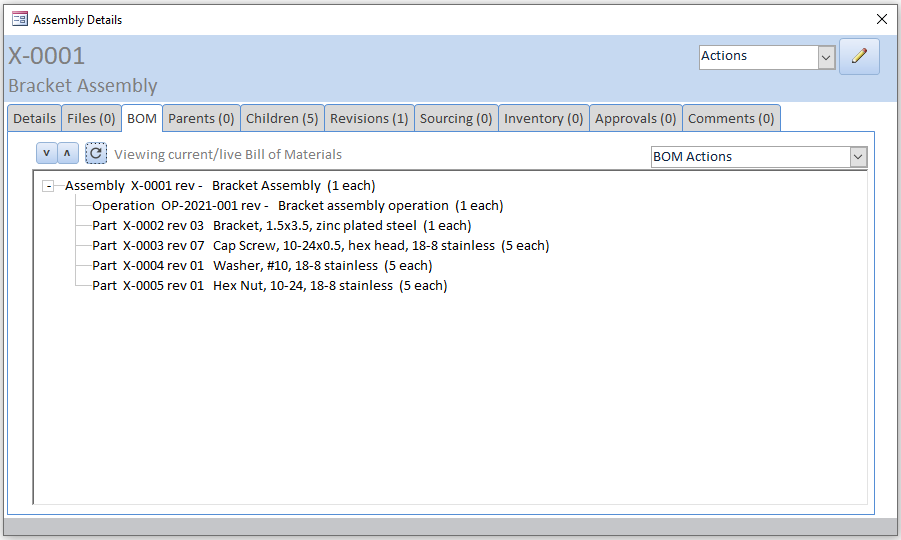
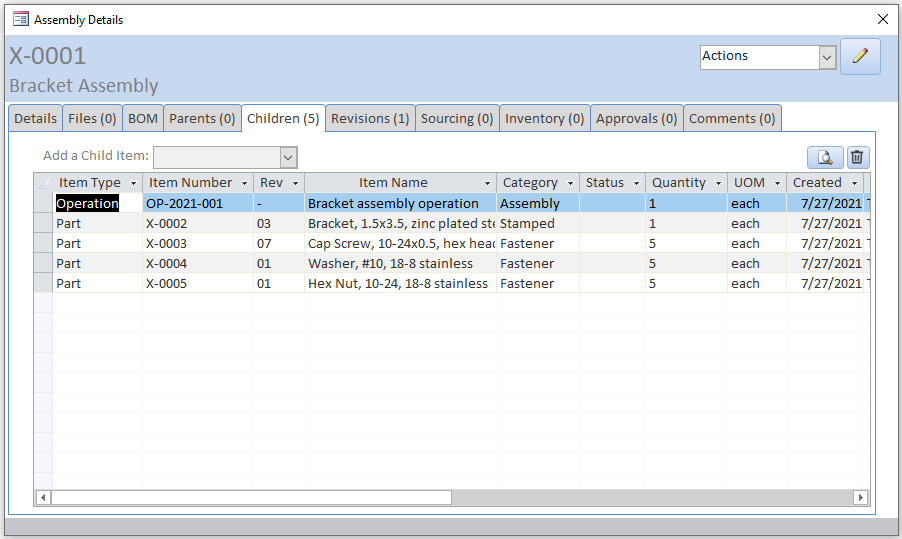
These represent the structure of how all your items fit together. A simple analogy is a family tree. A BOM (“Bill Of Materials”) shows all the items that go together to make another item. Often this shows all of the components of a finished product, for example.
The key point to understand is that in every relationship there is a Parent and there is a Child. The Child reports to the Parent, and the Parent uses the Child. (It’s a traditional manufacturing jargon thing.) The next key thing is to have a quantity in that relationship. Together these elements are the minimum information required to establish a relationship with which to structure an assembly or BOM.
1. Use the BOMs / Assemblies tab of the importer template (or make your own template with the columns matched appropriately) and fill in as much information as you have
2. Select the information you wish to import, and copy it (either right-click to select Copy, or use Ctrl+C keys)
3. Right-click on Data Actions in the ribbon menu, then choose Import, and Import BOMs / Assemblies
4. Ensure that you’re not importing any assembly relationships that are already set up as you will duplicate them in this step
5. Right-click on the row header in the first open row in the importer and select Paste, or use the Ctrl+V keys to paste the information you want to import
6. When your information is pasted and you’ve confirmed that it looks correct and is in the correct columns, click the Import button.
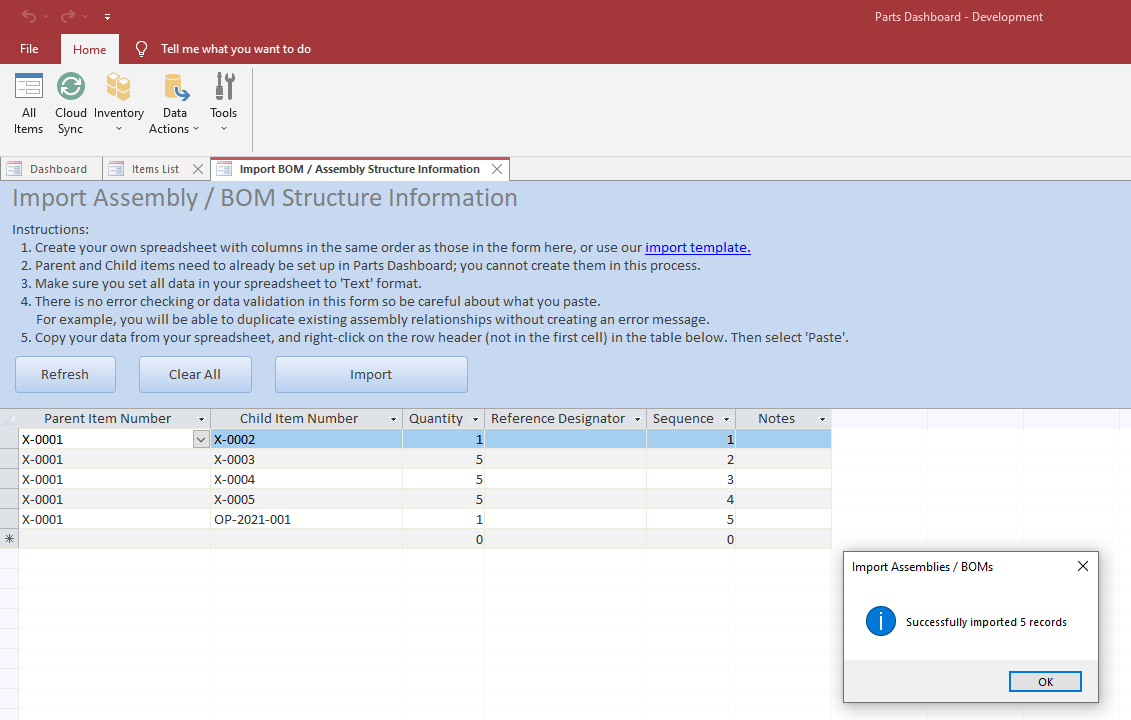
7. Import complete! Return to the main items list to find one of the items for which you imported assembly relationships, and then check that item’s BOM and Children tabs.
And that’s it. You’ve covered all of the various ways to import data into Parts Dashboard.
Please contact us if you have any questions or run into any problems.