This document describres how to set up the system configuration for Parts Dashboard using the System Configuration Options screen. There are four different tabs in the screen, and each covers different aspects of the system. They are:
Accessing Setup Options
The System Configuration Options screen can be accessed from the Ribbon by choosing More Tools, then the Setup submenu, and then clicking the System Settings option.
Only Administrators can change setup options, and they need to unlock the screen in order to do so, using the Unlock/Lock button in the upper-right. Edit and Read-Only users can view the information but
not change it, and Guest users cannot view this information.

General
The General tab allows for configuring log-in and password requirements, and options that are common to all the Item Types that will be set up in the next screen, such as paper sizes,
whether or not Revision Tracking and Inventory are used, and where is the common location for storage of all files associated with Items.

Require users to log-in
Forces all users to log-in each for session before they can access the application. If unchecked then users will be logged in as “Unregistered User”, but they can still log in later by choosing “Change Log-In” from the User Tools menu.
Password minimum length
The minimum length, in characters, that passwords are required to be. This is the only password rule. Entering 0 will allow users to have no password, even if they are required to log in.
Pre-fill Windows ID into user name log-in form
Assists users logging-in by capturing the Windows username and entering it into the User Name field in the log-in screen. This function is suggested only when user’s usernames match their Windows usernames.
Default paper size
Determines the formatting for printed reports. Choose the size most appropiate for your region.
Use Inventory
Allows for use of Inventory counting and tracking. Works in conjunction with the Allow use of numeric quantities in Links and Bills of Materials option in the Item Types section.
Use only approved Suppliers for Inventory transactions
Requires Use Inventory and Use approved Suppliers to be checked. Allows only approved Suppliers to be used when performing Inventory transactions.
File Storage group
Determines where all files associated with Items in this application are stored.
Item file storage location
Select where all files will be stored. Options are:
- Alongside Database: All files and folders will be stored in a folder with the install location of the database for this application. Best used for networked installs.
- Windows User Folder: All files and folders will be stored in the user’s own Windows user folder. This option is best used only for a single-user install.
- Other: Supply your own folder location. This requires a full path to be entered below, including drive name. Useful if files and folders are stored in a replicated folder with a service such as Dropbox, Box, Google Drive, OneDrive, etc.
Subfolder / Path
Supply either an optional subfolder name or required full path, as appropriate for Item file storage location. Use the “ ” button to the right to create or verify the folder.
Complete path
Displays the complete path to the storage folder as specified in Item file storage location and Subfolder / Path above.
Make Item file storage folders on demand without asking?
If selected then any time a folder to store files needs to be created then no message will appear asking if you want this to happen. If not selected then every time a folder needs to be created you will be required to approve folder creation.
Item Types
The Item Types tab is where different Item Types are established and configured. Item Types are key differentiators between the different classes of information that are stored in the application.
This is where you establish these different types, eg: Part, Document, Project, Task, etc. Different Item Types have different rules about how they can be related to one another, and will also display their details differently.
All these factors are configured on this screen.
Even with the screen locked, it can be cycled through the different Item Types that are set up, by choosing them from the drop-down list that is at the top of this screen.

Item Type
Select the particular Item Type to view options. New Item Types can be created by clicking the “+” button to the right of the drop-down.
Item rank
Determines where this Item Type appears in lists of Items. Lower numbers appear at the top of lists. Use integer numbers only.
Require Item Numbers for every Item
Determines if the user is forced to enter an Item Number when creating new Items. Not having an Item Number will prevent the “Open File” shortcut button from working and a file storage folder from being created and accessed with the “Open Folder” button (but these are the only limitations). An Item Number can always be added later if an Item is created without one.
Allow duplicate Item Numbers
Allows either just one, or multiple Item Numbers to exist within the same Item Type. Useful for things like inspections where you might have multiple inspection records of the same part and use the part number to identify the inspection records.
Use fixed length Item Numbers
Set this option to require all Item Numbers of this Item Type to be a pre-determined length. Any characters in the Item Number after the fixed length are treated as a derivative Item, and would be stored in the parent folder.
Item Number primary characters
Requires Use fixed length Item Numbers to be checked. This is the set length for Item Numbers for this Item Type.
Allow inheritance of Item Number and Name when creating a new Item from an existing Item
An assist when creating a new Item from an existing Item. Copies the existing Item’s Number and Name or Title into the new Item. These values can be edited in the new Item.
Use Links and Bills of Materials
Allows creation of links between Items in a Parent and Child relationship. If the Items were parts, this relationship would be a Bill of Materials (BOM). Selecting this option causes the Links, Parents, and Children tabs to appear on the Item’s details screen.
Allow use of numeric quantities in Links and Bills of Materials
Requires the Use Links and Bills of Materials option to be checked. Allows for the use of a quantity when adding Parents and Children to a Bill of Materials, or Links. This quantity will factor into Inventory calculations, if the Inventory option is being used. This is best used for physical things.
Use Revisions
Enables creation of Revisions or versions for Items. An appropriate details template will need to be chosen for a Revision field to appear in the details screen. If enabled, and if the Primary Item File group is appropriately configured, the File Open shortcut button will open the latest Revision file. Selecting this option causes the Revisions tab to appear on the Item’s details screen.
Use Revision tracking
Requires the Use Revisions option to be checked. Useful if distributions of controlled documents such as Revisions need to be tracked. Selecting this option causes the Revision Tracking tab to appear on the Item’s details screen.
Use approved Suppliers
Allows for adding various Suppliers to an Item’s record. If the Use only approved Suppliers for Inventory transactions option is enabled, then only these Suppliers can be used for Inventory transaction for the Item in question. Selecting this option causes the Suppliers tab to appear on the Item’s details screen.
Use Item approvals
Enables an approvals workflow for the Item. Suggested use is for things like Engineering Change Notices, where sign-off is required. Allows for multiple people to be added to the approval process. Selecting this option causes the Approvals tab to appear on the Item’s details screen.
Use comments
Enables comments to be appended to the Item. Comments appear chronologically and are tagged with the author’s name. Can be used either for leaving notes against the Item or as a way to have a recorded conversation about the Item. Selecting this option causes the Comments tab to appear on the Item’s details screen.
Allow Read-Only users to access the file folders for this Item type
Users with a Read Only privilege level can or cannot access file folders for Items. These users can still open the shortcut to the primary Item file.
Folders and File Storage group
Determines how and where files for each Item within this Item Type are stored.
Top-level folder name
Name of the folder containing all other folders for this Item Type. Options are:
- Item Type: All Item files and folders will be stored in a folder named exactly for this Item Type, eg: Part
- Client Name: Files and folders will be stored in folders named for the Client listed on the Item. If no client is listed in the Item then the name of your company will be used
- Other: Supply your own top-level folder name
Use the “” button to the right to create or verify the folder. This does not apply if Client Name is used because the top-level folders will be created on demand as Items are added.
Second-level folder name
Optional. Provides for a second level of nesting for folders. Options are:
- Item Type: All Item files and folders will be stored in a folder named exactly for this Item Type, eg: Part
- Client Name: Files and folders will be stored in folders named for the Client listed on the Item. If no client is listed in the Item then the name of your company will be used
- Other: Supply your own second-level folder name
- None: No second-level folder will be used
Use the “” button to the right to create or verify the folder. This does not apply if Client Name is used because the second-level folders will be created on demand as Items are added.
Use individual folders for each Item
HIGHLY RECOMMENDED. Stores Item files in separate folders for each Item Number. If this option is not checked then all files for all Items of this type will be stored together in the same folder.
Folder prefix
Optional. Enter text here if you want some fixed label to be added to the beginning of each Item’s individual folder. Leave blank for none. The Item’s Item Number will appear after this. Be sure to add a space after your text if you want a gap between this and the Item Number when the folder is created. Leave blank if not used.
Sub-folder name
Optional. Use this option if intending to store files in a folder one level below the Item’s primary folder. An example would be where a part’s files are stored in a folder named with the part’s Item Number. Then, say, inspection files could be stored in a subfolder under that, eg: “QC”. Leave blank if not used.
Complete folder path
Displays the complete path to the storage folder as specified above.
Create additional sub-folders
Optional. These will be created inside the Item’s individual folder. Separate folder names with a semicolon, and no spaces. If no sub-folders are desired then leave this blank.
Primary Item File group
Determines what file is opened when using the Open File button in the main list of Items, and in the Item details screen.
This doesn’t need to be used but it provides a helpful shortcut to a single file associated with an Item, eg: a released drawing, or picture.
Item file name separator
Text to go between [ItemNumber] and [ItemRevision] for finding the file to display, eg: _rev_. Spaces can be used here.
Default Item file type
Default file type extension for the display type, eg: pdf, dxf. Do not use a period at the beginning of this value.
Item file path and name
Shows the combined file path and folder name where files for this Item Type will be stored.
Tags group
Parts Dashboard has various user-configurable classifications for Items. These are applied through the Item’s detail screen. You should set up collections of Tag types here for each Item Type. An example is a Part Item has a Category field that can be divided into: Reserved, Development, Released, Obsolete. Develop tags that best suit your business processes.
Tag Type
Not all Tag types are used in every Item Type detail template. See the different details templates. Here are the four Tag types currently used:
- Category Used in Part, Document, Project, and Inspection detail templates
- Disposition Inspection
- Priority Project
- Status Part, Document, Change, Project, Inspection
Tag
The value of the Tag. In the above example, the four Tags are Reserved, Development, Released, Obsolete.
Rank
Tags are ranked when appearing in drop-down lists. An integer number can be entered for the rank, or it can be left blank, in which case the Tags will rank alphabetically.
Add button
Creates the new Tag and adds it to the collection for the chosen Tag type.
Refresh button
Re-orders the Tag list if list entires have been manually edited.
Sequences
The Sequences tab allows for automatic creation of pre-configured sequences of Item Numbers. Users can also enter Item Numbers on their own when creating new Items, according to whatever rules they may have for Item numbering.
This saves having to manually look up which is the next number in sequence.
If this option is enabled, a “+” button will appear next to the Item Number field when creating new Items; users can still enter their own Item Number or have one generated.
Currently there is only one automatic generation sequence available. It begins the Item Number with the current 4-digit year then a dash then an incrementing number of user-specified length:
[current 4-digit year]-[incrementing number]
For example, if the user-specified length of the incrementing portion is 4 digits, then the first number available for 2015 is:
2015-0001
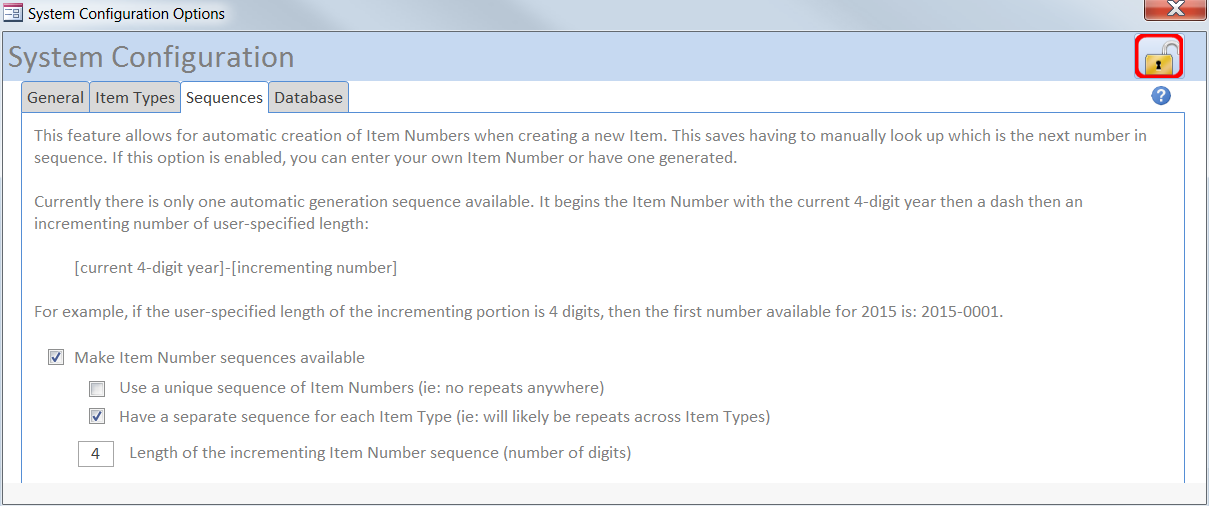
Make Item Number sequences available
Provides a button in the New Item entry screen to enable creating an auto-generated Item Number.
Choose from one of:
Use a unique sequence of Item Numbers
The incrementing sequence of numbers is common to all Items. This means there will be no repeats of the incrementing number anywhere.
…or
Have a separate sequence for each Item Type
The incrementing sequence of numbers is individual to each Item Type. This means there will likely be repeats of the incrementing number across different Item Types.
Length of the incrementing Item Number sequence
The length, in numbers of digits, of the generated incrementing section of the Item Number. Use only integer numbers. In the example above (“0001”), the length is 4.
Database
The Database tab enables re-connecting to the application’s database if it has been moved to a different location.
Depending on what version of this application you may be using, this screen may or may not be available.

Database is stored alongside this application
This option is currently unavailable. Tells the application to automatically look for the database file relative to where this application is installed.
Database sub-folder name
Allows for storing the database in a subfolder relative to where this application is installed.
Database file name
Name of the database file.
Refresh Connection
This option is currently unavailable. If the Database is stored alongside this application option is chosen, and the information in the Database sub-folder name and Database file name fields has changed, then use this button to refresh the connection to the new database file.
Database is stored in some other location
Manually connect the application to a database file.
Connect New Database Location
Use this option to navigate to and select the database file.
Currently connected to Database
Displays the path and file name of the database this application is connected to.